Saturday, January 9, 2010

I'm back! (sort of)

Well, my computer is still not working, but I've found a reasonably good work-around that will let me post pictures on my blog. I can use the USB cable to get the photos from my camera to the little loaner netbook I'm using, but the problem was the image editing. A little light bulb went off in my head the other day and I looked for -- and found -- a few sites that have online image editing! You upload your photo to the site, do the editing there, and save it back to your computer (or wherever you're saving it to). However, I had trouble with all three that I found, and ended up with a big headache, and ultimately had to work with the very rudimentary Paint program that lives on this Linux machine.

So without further ado, here's a card I'm just so happy with that I couldn't stop looking at it when it was done. I used one of the sweet Pure Innocence images.
All the patterned papers are from the Early Bird paper pack (which I got from Kate at i {heart} papers, but she appears to be out of it), including what I used to paper-piece the dress. You can't see it in this photo, but I used my Sakura Glaze pen to make the black shoes shiny, and there's Glossy Accents on the balloon. The ribbon is from Papertrey.

Hopefully my computer will be back in action soon. In the meantime, I will keep trying to get adequate results with what I have. Please be patient :-)

Carolyn

Thursday, December 31, 2009

Happy New Year!

Well, I still don't have a means of posting pictures (other than downloaded clipart) using my temporary replacement computer, but the good news is that the new motherboard is finally "in the house" and ready to be installed as soon as awesome Cousin Mark can come and do it. I'm not touching that thing again!

I hope you all had a wonderful holiday. I know I did! My fabulous kids and kids-in-law bought me a new flat-screen HTDV. How awesome is that?!!! My son-in-law said he'd come and hook it up when Cablevision delivered my HD DVR, and that came last night too! Can't wait!!! It's gonna be a good weekend!

As far as the new year goes, I am only too happy to say goodbye to 2009. While some really good things did happen (like my son marrying my beautiful, wonderful and talented daughter-in-law), there were some really crappy things this year, too. Let's hope that 2010 kicks 2009's butt!

I have actually been looking forward to spending this New Year's Eve quietly at home alone. This is my plan: since my goal for 2010 is to finally get published, I will spend tonight making cards for submission. At least one — we'll see how the mojo goes. I have a split of champagne (a favor from my cousin's wedding this past spring) chilling in the refrigerator, so I'm good to go!

I want to thank you for following my blog, and I hope to have lots of papercrafting goodness (and maybe a cake or two!) for you to gaze upon soon.

I wish you all a happy, HEALTHY, and prosperous new year.

Sunday, December 20, 2009

So sad....

I have no pictures to post for you until after Christmas. Sadly, the motherboard on my computer is fried, according to my awesome cousin Mark (everyone should have a cousin Mark!), although as far as he can ascertain, it has nothing to do with anything I might have done (whew!). I've ordered a replacement board, which he will install when it comes, but it won't be until after Christmas.

I do have pictures of the holiday cards I finally sent out (well, most of them, anyway), but they are stuck in the limbo that is my hard drive. Thankfully, awesome cousin Mark lent me a little netbook to use until the new motherboard (hopefully) gets me back up and running. So I will take this opportunity to wish you all a happy, healthy, and joyous holiday. Hopefully I'll be able to post some eye candy before the new year!

Thursday, December 17, 2009

Happy Sweet 16!

Yesterday was my niece Hannah's 16th birthday (how did that happen?!!!), and since she should have gotten her card by now, it's safe to post it here. I raided my stash make it as sparkly as possible, and used a cupcake theme because they are as sweet as she is.

The "sweet" letters are some glitter stickers I had in my stash, and the bling-y "16" is from the Zva Alphabet. The glittery hearts are from a K & Co pack I had in my stash (I have a really big stash). I used my Swiss Dots Cuttlebug folder on the Chocolate Chip CS to give the background some texture. The patterned circles are cut from pieces in my stash also. I know one of them is from my Urban Prairie pad. I think Kate at i {heart} papers used to carry the cupcake paper, but I don't see it any more. The cupcake stamp is from Papertrey Ink. I embossed the bottom with brown EP, and I coated the top of it with Rock Candy Stickles.

Anyhow, if you're reading this, Hannah, I hope you had a wonderful day — and as I said in the card, your present is on its way!

Tuesday, December 15, 2009

Eat, Drink & Be Merry (an IHP challenge)

This month our DT Challenge Coordinator (Deb) gave us sort of a double challenge — we had to use one of the new My Mind’s Eye collection kits, and whatever we made with it had to have something to do with “Eat, Drink & Be Merry.”

eat-drink-merry-challenge I interpreted this as being anything to do with a party, so I used a sheet of the adorable paper from the Love Me Do collection kit and made a party popper favor and a cupcake wrapper (using the Bigz Perfect Settings die from SU!). You can see that the paper is double-sided, so it was perfect for this. The yellow tissue paper was the only color I had laying around at the moment (how lucky was I?), and the ends of the favor are tied with Red 1/4” Glimmer Ribbon. The favor itself, of course, is made from an empty TP roll. (And yes, I made the cupcake – several actually!)

Both pieces are super-easy. Just because this kit is intended for Valentine’s Day doesn’t limit you to that one occasion! Can’t you just see a whole table decorated with coordinating favors and cupcakes for a birthday party?

Do you have any “Eat, Drink & Be Merry” ideas to share? Join the challenge, and let me know! If you post it in a gallery, use the keyword ihp1209 so we can find it.

And check out the rest of the design team to see how they met the challenge:

Amber
Cathleen
Deb
Gretchen
Kate
Kendra
Lori
Lynn
Megan
Merry
Tracy (check hers a little later – around 11am)

Have a great day!

CMsignature

Saturday, December 12, 2009

On the 12th day of Christmas...

i {heart} papers is the sponsor of Day 12 (12 drummers drumming) of the 12 Days of Christmas event over at Paper Craft Planet. It's a fun scavenger hunt, so go play for a chance to win!

Saturday, December 5, 2009

Home for the Holidays

home-made-box1 This is how I spent the better part of today – making this adorable gift box that looks like a cozy holiday cottage. Lauren Meader is a freakin’ genius – how she comes up with these templates is beyond me. Yes, it is very time consuming to make one of these (definitely not for mass production!), but the precision with which the pattern was made makes it go together perfectly.home-made1b

I didn’t add a whole lot of detail, and I forgot about the curtains for the windows until I was doing the sides of the house, but I really just wanted to see how much of a PITA it would be to construct the first time. Like I said, time consuming, but not difficult.

I have no idea who I’m giving this to (if I can even bear to part with it), or what I’d put inside. You can’t tell from the photo, but the house is only about 5” from the bottom to the peak of the roof. It is fairly sturdy, though I don’t know how much weight I would put in it. I’ll have to give it some thought, but whoever gets it is gonna have to be someone pretty darned special!

What I used:
Stamps:
PTI Home Made & Believe (for the wreath on the door)
Ink: Palette Charcoal, PTI Terracotta Tile & Lemon Tart, Copic markers
Paper: SU Bordering Blue & Going Grey, Classic Crest White, scrap of terracotta patterned paper from my Marrakech pad (Basic Grey)
Other: PTI Home Made template, Polar White Flower Soft, PTI Terracotta Tile satin ribbon

CMsignature

Friday, November 27, 2009

Black Friday Sale at i {heart} papers!!!

The leftovers are all put away, and now it's time for some serious fun! The fabulous i {heart} papers Black Friday sale is finally here!

Here are the details:

FREE SHIPPING on US orders $25 or more ($75 or more for Canadian orders) PLUS…

  • For every $50 spent, you will receive a $10 gift certificate towards a future purchase. That’s like an automatic 10% off coupon ON EVERYTHING – even new and sale items! Orders do not combine however they are incremental, meaning, a single order of $50 earns you one $10 gift certificate and a single order of $100 earns a $20 reward certificate. You cannot however place one order for $20 and another for $30 and qualify for the gift certificate. Additionally at $45 order and $55 order does not qualify for you for a $20 reward.
  • Qualification amount does not include shipping total – it is merchandise total only.
  • Following the sale, on December 1, you will receive a one-time use $10 gift certificate for every $50 order you place during the qualification period. Minimum order amount for qualification is $50.
  • Gift Certificate purchases are not included in the sale.
  • Rewards certificates are valid for redemption beginning December 1, 2009.
  • Reward certificates are transferable.
  • Sales runs 12:01am (EST) Friday November 27 – 11:59pm (EST) Sunday November 29
  • You must enter the Coupon code from the banner ad at the time of ordering.
  • Can not be redeemed for cash or combined with any other discounts/coupons.
Have fun!

Sunday, November 22, 2009

Mazel Tov, Joseph!

This weekend I had the privilege of witnessing my nephew Joseph become a Bar Mitzvah. He did a magnificent job and I am so proud of the impressive young man he has become! And I suppose I must forgive him for suddenly being taller than his Aunt Carolyn.

jm-barmitzvah-book-closedThe prayer shawl he wore was a beautiful burgundy/black iridescent silk, so I wanted the packaging for his gift to tie in with the colors. I borrowed Nichole’s Bank Book & Box idea and did it in Scarlet Jewel and Brushed Gold.

jm-barmitzvah-book-open This is an awesome way to package up a gift of cash, but you could also slip a check into the gold cord instead.

Anyhow, it was a wonderful weekend filled with lots of family and lots of food! And I’m sure Joseph (and his mother) is glad it’s all over with!

CMsignature

What I used:
Stamps: PTI Mazel Tov
Ink: Memento Black, Versamark, Copic markers
Paper: SU Brushed Gold, PTI Scarlet Jewel & Vintage Cream
Other: gold embossing powder, gold satin ribbon, gold cord,
gold brads, Nestabilities,

Tuesday, November 17, 2009

IHP November DT Challenge

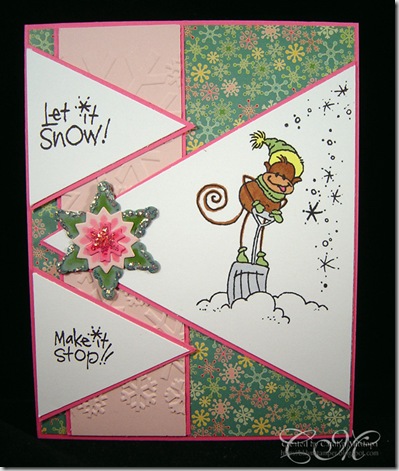
Every month, Deb Felts, our i {heart} papers Design Team Challenge Dominatrix Torturer Coordinator, assigns us a task.nov-challenge-sample In the past, there have been challenges based on specific products or themes. This month, however, Deb showed us a card that she especially liked (made by Joanne Grzelak) and challenged us to use it as a sketch to base our own cards on. Pretty card, yes? Hmmmm. But did anyone realize that in order to get those triangles to line up that way, you had to do MATH?!!!!

I resisted the temptation to call my son the Math Doctor (yes, he really does have a PhD in Mathematics), and kinda figured it out myself. And just to be contrary, I flipped the layout around. Here is my answer to the challenge:

make-it-stop

Now, if you know me at all, you know that I do NOT like snow. At all. It’s pretty to look at… for about 10 seconds. Then I’m over it. So when I saw this Changito Snow Play set, I knew it would be mine if only for the “make it stop” stamp!

But there certainly are a lot of snowflakes on this card! The snowflake embellishment was made using Nestabilities Create a Flake 1 and a bit of Icicle Stickles. The patterned paper is from the Cosmo Cricket Jolly By Golly 6” pad. And texture is added to the Sweet Blush (PTI) strip of cardstock with a Quickutz Snowflake embossing folder. All of these supplies (except the cardstock) are from i {heart} papers, of course.

OK, if you’ve read this far, you deserve to know how to make the triangles :-)

For the big one, start with a 4” square of white cardstock. Along one side of it, make a little mark at 2”. Now connect that spot to the 2 opposite corners to form a triangle and cut it along the lines. For the smaller ones, do the same thing starting with 2” squares marked at 1” along one side. I just hand-trimmed the Hibiscus Burst (PTI) layer around it. (If you look closely, the angles on this card are a wee bit off because I goofed a little on the measurements of my large triangle, but you get the benefit of my experience!)

We’d love it if you took the challenge yourself. Go ahead, I dare you! And if you do, please let me know and post it to the Splitcoast and/or Papercraft Planet galleries tagged with “ihp1109” so we can find it.

And check out what the rest of the DT did with the challenge:

Kate
Cathleen
Deb
Gretchen
Lynn
Megan
Tracy
Kendra
Amber

Happy stampin’!

CMsignature

Monday, November 16, 2009

Let’s Party!

party-elephant

Today marks the i {heart} papers release of yet another adorable stamp set from Chicken Girl Design. This one is called Birthday Wishes, and the images in this, as in all of Jannie Ho’s sets, just beg to be paper-pieced. So I couldn’t resist making a pink elephant for this card; don’t you see pink elephants when you party?!!

The paper is all from the Basic Grey Urban Prairie 6x6 pad. I lightly edged the rectangles with a black marker to set them off a little against the Sweet Blush (PTI) base. I used the layout from the Saturday Sketch Challenge #124 (sort of). 

Remember, Chicken Girl Design stamps are ONLY available from i {heart} papers. So go get your hands on this brand-new set and make something adorable! And when you post it in the Splitcoast or Papercraft Planet galleries, don’t forget to tag it with IHPCGD so we can all find it.

Have a great week, and stay tuned tomorrow for the IHP Design Team Challenge.

CMsignature

Friday, November 13, 2009

A Holiday Card You Can Play With!

TESC91The general concept for this card came to me as I was falling asleep the other night; I wanted to find another way to use the Shake It Pouch for something other than the standard shaker card. When I saw Taylor’s sketch challenge today, it was so perfect for my idea that I had to try it right away! 

First, here’s the card:holidaypeace-gameNice, yes? Fits Taylor’s sketch, pretty colors, blah, blah, blah…  But let’s take another look at that wreath:
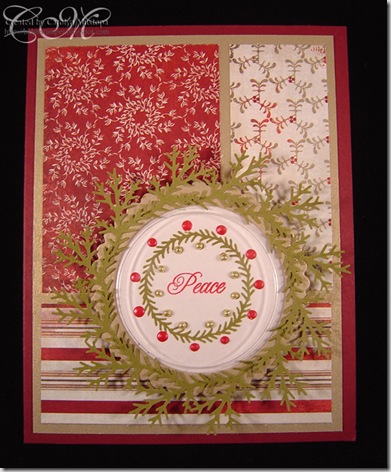
holidaypeace-inset1Do you remember those little games where you have to get the little balls into the holes? That’s what I made here! I spent half the morning looking for the right image to use, and once I found this wreath in Papertrey’s 2008 Holiday Tag Collection, I knew exactly what I was going to do.

Here’s a little rundown of how I did it. First of all, I used a small circle Shake It Pouch (available at i {heart} papers) for the game. The base is actually 3 layers of white cardstock, cut with circle Nestabilities to the size of the outer dimension of the shaker piece. The top layer is stamped, then attached with lots of adhesive to the second layer. I then punched holes through both layers using an eyelet punch (Silent Setter that I haven’t used in eons!). Then I attached the third white layer to the back, being careful to only use glue around the edges and in the center so there would be no glue near the holes.

Then I applied the red Liquid Pearls to the outer dots and waited (forever!) for it to dry before I put the little gold balls into the holes, peeled the sticky backing off the outer edge of the shaker pouch, and stuck it onto the whole thing. BTW, the little gold balls are small edible dragées that I got at the baking supply store. If you can’t find those, you can use the silver dragées they sell in the supermarket which are a bit bigger. Just use a larger punch for the holes.

The frame was made by nesting plain circle and scalloped circle Nestabilities, and I used my Martha pine bough punch for additional embellishment.

I used PTI Scarlet Jewel and Ripe Avocado, SU! Brushed Gold cardstock, and the Basic Grey Wassail 6x6 pad.

This was a really fun card to make, and I confess that I’ve played with it several times already! If you have any questions, please leave me a comment and I’ll try to answer.

CMsignature

Wednesday, November 11, 2009

Just Skating By…

 jannie-skating-bday1 It’s not every day you get to make a birthday card for someone using stamps they designed! And now that I know she’s received it, I can share it with you!

When I saw the magical marquee card that Diana Gibbs made a couple of weeks ago, I couldn’t wait to make one, so I followed her link to JanTink’s awesome tutorial. As luck would have it, the designer of these stamps (Jannie Ho) had a birthday coming up, and these little guys from Just Skating By were perfect for what I had in mind.

Now here’s the magic — when you open the card, this is what you see:

jannie-skating-bday3

Fun!!!! And not as difficult as it looks, especially with JanTink’s tutorial. I had to hand write the greeting inside, because even though I have 65 million stamps, I didn’t have a “happy birthday” with the right kind of font! And that birthday cake in the middle? That’s a sneak peek from Jannie’s new set that will be released exclusively by i {heart} papers next week.

Jannie, I hope you loved the card as much as I loved making it! And I hope your birthday was as special as you are!

CMsignature

Thursday, November 5, 2009

For sweet little Henry

hello-monkey1 This week has been a very sad one. Henry Morgan Anderson, the 3 year old son of our former DT member Sarah Anderson and her husband Darrin, died Monday, November 2, 2009, after being unable to overcome a virus that made him ill last week. Henry enjoyed almost daily visits to the local zoo. There, he would watch the feeding and care given to the various animals.

Lorie Ames has organized a way to donate for a memorial for Henry. As a memorial, trees will be planted at that zoo in his honor. Melissa at Pink Cat Studio has created a digital stamp to help raise funds for a tree for Henry. I’ve used the digital stamp in my card above, as well as a digital greeting that Melissa has available on the site. All proceeds from the sale of the digi stamp, minus Paypal costs, will go towards the tree.

If you would like to donate towards the tree, please visit PCS to purchase the digi stamp that I used on my card today. Another way to donate to the memorial is to print out this form and mail in your donation directly. You can send in any amount using the form. The funds will be pooled.

Please be sure to write on the form that the donation is for Sarah Anderson’s son, Henry. Once all of the money is collected, a tree and location will be selected. If you have questions about the form please contact Lorie Ames. Lorie will be in contact with Sarah along this memorial journey to ensure that her wishes are followed.

To contact Lorie, please visit her blog.

If you don’t know Sarah and would like to learn more about her, please visit her blog.

Thank you for your help in raising money for a tree for Henry.

CMsignature

Monday, November 2, 2009

Birthday Blog Candy WINNER!

A big "Thanks" to all of you who entered and are now my blog followers, and to all those who wished me a happy birthday. It was, indeed!

I'm happy to announce that LISA LOU is the winner of the blog candy! Lisa, please contact me at cmustopa (@) verizon.net with your mailing address so I can get your goodies out to you.

Have a great Monday!