Thursday, August 11, 2011

Unity Hop-Along

Hi! Today the IHP DT is Hip Hopping along with the Unity Design Team. So be sure to check all their blogs for fabulous projects showcasing Unity! In celebration of this little hop, ALL full-sized Unity kits at IHP are $12 or less! But, there is VERY limited inventory and these past kits will not be restocked, so don’t wait or you might miss your chance to get them at this fabulous price.

Here’s my card:
unity-thread It uses the Unity Itty Bitty set By a Thread, and paper from the Stella Rose Hazel 6x6 pad. I used one of the Copic markers that I colored one of the thread spools with to dye the white ribbon the same color, and added a little faux stitching with a white opaque pen. The patterned paper and the focal circle are cut with Nestabilities.

I don’t usually do any “dressing up” on the inside, but this time I did.
unity-thread-inside Go check out what the rest of the IHP DT did with their Unity stamps:

Kate
Tracy
Kendra
Lori
Deb
Lynn
Gretchen
Loretta

Happy hopping, and happy SHOPPING!

CMsignature

Saturday, August 6, 2011

Two days in a row!

rustic-butterfly-TY Here’s another card I made recently with some goodies I got at CHA a couple of weeks ago. It has sort of a rustic feel to it, which is pretty much outside my comfort zone.

The nice people at the Scor-Pal booth were kind enough to give me a Scor-Bug tool when I mentioned that I’d been wanting to try one. That was the launching point for this card, which uses a kraft panel edged with the little bugger.

At the Simple Stories booth, they had some samples of paper from the Days of Summer collection out for the taking. It was a piece that had circles of different patterns from the collection, so I punched some butterflies out of a few of them, and a circle out of another. I trimmed it with some adhesive paper lace from Basic Grey, and stamped it with one of my favorite stamps from Papertrey’s Signature Greetings set. The butterflies are blinged up a bit with rhinestones. Had to add some bling somewhere!

It’s a beautiful day, and I’m gonna head out for a long walk, ‘cause I think it’s supposed to rain later.

CMsignature

Friday, August 5, 2011

Let’s play catch-up

I’ve been stamping a lot, but not blogging a lot. Need to do something about that, since I do enjoy sharing my creations (even if the inspiration for them is often liberally borrowed from others). No excuse except for laziness, I suppose, and the fact that I don’t feel very chatty. So I decided that the answer, at least for the time being, is to set out to just post pictures of the stuff, and not put pressure on myself to be witty or verbose, and just see what develops.

There were a lot of friends’ birthdays in July and I realized I never posted pictures of the cards. Sadly, not all of these friends actually got cards. Blame it on Facebook.

So let’s start the game of catch-up with a couple of the cards that actually got made and mailed.

scrolled-bdayThis was for my wonderful friend Kate (owner of i {heart} papers). Paper is from the For the Record collection kit, stamps are Technique Tuesday’s Stamping in Circles, and I used one of the Spellbinders fancy tags set for the scrolled medallion piece. I loved how it coordinated so well with the paper and stamp design! I colored in the white space on the circle thingie with a Copic marker to make it match the paper better. What I forgot is that Kate is not fond of red. Sorry!

jackie-irisNext up was my friend Jackie’s birthday. Jackie loves purple. This I remember because I do too. I used a stamp from the Stained Glass set by Flourishes, and paper from the Memory jackie-iris-copicsBox Enchanted 6x6 pack. I had fun with my Copic markers with this one. I even remembered to take a picture of which ones I used. Hmm, I see that I missed a couple. Sorry!

OK, I think I’ve used up my word quota for this post. Hopefully there will be more later. Words, I mean. And posts.

Later,

CMsignature

Tuesday, July 26, 2011

July IHP DT Challenge: Charity Logo Inspiration

For this month’s IHP Design Team Challenge, we were asked to use the logo of a favorite charity as inspiration for our card or project. I doubt there’s anyone reading this whose lives have not been touched in some way by breast cancer, and my family is no exception. I used the logo of Susan G. Komen for the Cure® as inspiration for this cute little phone message pad.

july11-IHPDTC I love their whimsical use of the ribbon image to represent a person running, since the fundraiser they’re SusanGKomenLogo452famous for is the Mother’s Day Race for the Cure. I used the whimsical-looking telephone from the Just My Type stamp set by Lawn Fawn, stamping it in Memento Tuxedo Black and coloring it with Copic markers for the main image, and stamping it repeatedly in light pink as a background as well as on the bottom corner of each page of the note pad. I used a piece of yummy Light Fuschia Faux Suede ribbon around the bottom of the top panel to visually balance it and give it a little texture. It’s all mounted on a layer of light pink over a base cover of PTI Raspberry Fizz cardstock.

If you’d like to know more about Susan G. Komen for the Cure®, simply click on the logo above. If you’d like to show us how a favorite charity logo has inspired you, we’d love to see your work. Just post it to the SCS or PCP gallery using the keyword ihp0711 so we can find it.

Now go check out what Kate and the rest of the IHP Design Team did with this challenge:

Thanks for stopping by!

CMsignature

Sunday, July 10, 2011

Baby’s Birthday Weekend

OK, she’s not a baby. But she’ll always be MY baby, no matter how many times she celebrates birthdays! This year my youngest, Annisa, set a goal to move into her own apartment (and out of the one she shared with her sister) by her birthday, and she did it! She found a gorgeous studio apartment in Manhattan, and christened it with a double-header birthday celebration – one for friends and one for family – since it isn’t quite big enough to handle everyone at once. This called for two cakes. And one card. Very clever of me: offer to make cakes for both parties and you get to go to both of them!

Here’s Cake #1:
annisa-birthday-orange I tried to tie the colors in with her apartment (the sofa is orange, the rug is black and grey, table is white, chairs are black). This was a 9” chocolate cake filled with chocolate ganache, raspberry jam and fresh raspberries. Covered in orange and black fondant. Very yummy.

Cake #2 was a 6” carrot cake with cream cheese frosting:
small-annisa-orange-bday Very yummy as well. I ate altogether too much cake this weekend. And drank too much wine. I think I’m gonna skip my weigh-in tomorrow.

And here’s the birthday card:

annisa-birthday-butterflyBecause she is my beautiful, ever-evolving butterfly. Wish BIG, my sweet baby! And fly high. Love you, Annisa!

me and annisa 

(isn’t she gorgeous?!!)

CMsignature

Monday, July 4, 2011

New Improved Storage!

I had a very full weekend! Took a little road trip with my sister down to New Hope, PA to see my brother play with an awesome Steely Dan tribute band, and to celebrate his birthday. And on the way back, we stopped at Ikea. I’ve been keeping all of my PTI stamp sets in CD boxes on a shelf in my craft closet, but somehow the ones I use most end up sitting on the desk, cluttering it up. I had some space on the wall in front of me, and I found these fabulous wall-hung CD racks at Ikea that would let me store all of my MANY PTI sets right in my face!

newPTIracks And see – I even have room for more! Each unit is about 34” long and holds 76 CD cases. It’s called Lerberg, and it was ridiculously cheap – like less than $6, I think! And they can be hung horizontally or vertically, whichever suits your space better.

If you’re wondering what is right below the racks, it’s a magnetic strip that I hung there so I could keep inspiration/reference things handy, like the printed out sketch challenges every week. There are little magnet circles holding the papers up.

To put it all in perspective, here’s what’s above my desk:
On the left is the ribbon rack that my Dad made me last year. The lower shelves are great for keeping my ink pads and Bow Easy handy, as well as my stash of buttons. Martha punches sit nicely on top of the unit, and a flex-neck lamp is clamped onto it. There’s another lamp you can see on the desktop at left. Can never have too much lighting, especially with these aging eyes!

Sitting underneath the ribbon unit are the plastic boxes with X-dividers that hold all my Copic markers.

It’s great to have everything at my fingertips. Now I just need to spend some time playing with it all!

CMsignature

Friday, July 1, 2011

Holy Macarons!

plated-dozen These little Parisian nuggets of decadence, made of ground almonds, egg whites and sugar, are all the rage in NYC now. I’ve heard nothing but how difficult they are to make, so of course I had to give it a try. And because it is the way I am, I researched the topic to death! Read every blog, every recipe, every tip sheet that I could lay my hands on that had anything to do with macarons over the last week.

Tonight, after aging my egg whites for 48 hours, I screwed up my courage and gave it a go. After lots of measuring, weighing, sifting and beating, the results are better than I expected for my first time. Slightly browned (they aren’t supposed to be), and slightly chewier than I think they should be, they are nonetheless BEAUTIFUL to me. Look at those dainty little frilly feet! closeupThey are filled with seedless raspberry jam. And for all that work, I only got ONE DOZEN out of it.

They’re supposed to get better, taste and texturewise, after aging a day or two.

Somehow I don’t think I’m gonna find out.

CMsignature

Tuesday, June 21, 2011

IHP Design Team Challenge – and a SALE!

This month, the i {heart} papers Design Team was challenged to create something based on “Sensational Summer.” Being that summer actually begins today, I think it’s quite appropriate!

Using some bright, summer-y papers (Echo Park’s Summer Days) and one of my favorite Chicken Girl Design stamp sets (Hugs from a Bug), this is what I came up with:

JuneIHPchallenge-picnicI paper-pieced the smiling sun in the corner using an old OCL set (Sunshine Cheer) and highlighted it with some yellow Stickles. The grass that the cute ant is walking on is covered with Flower Soft. The layout was based on this week’s Mojo Monday Sketch Challenge (which kinda gives away the fact that I waited until the last minute to do  this!).   

Before I send you over to see what the rest of the design team came up with to celebrate summer, let me tell you about the spectacular Pre-CHA Clearance Sale that Kate is having starting TODAY!

Even though new items are still arriving in the store (new Unity, OCL and Echo Park, to name a few), CHA is only a few weeks away! Starting today, IHP is having a HUGE Pre-CHA Clearance sale to help make room for new things that will be purchased at the show. Some highlights of the big sale:

  • All Unity $12 or less, including store kits and co-brands
  • Unity Itty Bittys $3.25
  • OCL (except the latest releases) are all $11 or less
  • All open stock 12x12 only 25¢ per sheet
  • Flower Soft only $4.50!
  • Stampavie only $6!

But there is much, much more, so be sure to check out the sale page for all the details! And, as always, free US shipping with your $50 order!

Now go check out what these very talented ladies came up with for this challenge:

And then GO SHOPPING!!!! Happy Summer, everybody!

CMsignature

Sunday, June 5, 2011

It’s been too long

I’ve been a bad, bad blogger. No good excuses – just caught up in baking stuff and family stuff, so my downtime was really crash time. But I’m jumping back in with this little number. I think it says it all…

typewriter-miss-you I used this week’s sketch challenge from The Sweet Stop (SSS111). When my mojo is stalled, sketch challenges usually get me started again. The typewriter stamp is from Just my Type from Lawn Fawn, but the message stamped on the paper is from the Talking in Circles set from Technique Tuesday. I love being able to mix and match my stamp sets! The patterned papers, the border and letter stickers are from the fabulous For the Record 12x12 Collection Kit. Of course all of these, as well as the Copic markers I used to color the typewriter and Nestabilities I used to cut it out, are available from i {heart} papers.

I have more to catch you all up on (those of you who are still following me after my abysmal posting track record), but that will have to wait a bit. For now, I’ll just say that I’m glad to be (hopefully) back in the swing of things, and I truly appreciate (more than I can say) those of you who are actually reading this.

Later,

CMsignature

Tuesday, May 17, 2011

IHP DT Challenge – Color Blocking

This month our fearless i {heart} papers design team challenge coordinator, Deb, challenged us to use the Color Blocking technique for our card or project. I know there are many variations of this, and some are more clean and simple than what I ended up doing. Anyway…

IHPmay11DT-colorblock I’ve been wanting to make a Gratitude Journal for a long time. I bought the blank lined book ages ago, and decided that this challenge was the perfect opportunity to actually do it. So I grabbed a piece of graph paper and started sketching out block designs until I came up with one I was happy with.

Then I broke out my Echo Park “For The Record” 12x12 Collection Kit and started cutting. The rose, letters and words I added are all from the kit as well. The stamped words on the yellow block at the lower right are from the OCL set Big Thanks – I just selectively inked and stamped (with my favorite Palette Noir ink) the words I wanted, omitting the ones I didn’t. It’s a great way to get added value from the stamps you have.

The blocks were first arranged and glued down to a black cardstock piece cut to the size I needed to cover the ugly print that was already stuck on the front of the book. After it was all decorated to my liking, I used my i {stick} papers redline tape to adhere it to the book.

All in all, I’m pleased with how it came out. Thanks, Deb, for forcing my hand on this. Oooh – that can be my first entry for my gratitude journal! And of course, I’m grateful for all of you who are actually taking the time to look at this :-)

Now go check out what the rest of the IHP design team did with this challenge:

Kate
Deb
Gretchen
Kendra
Loretta
Lori
Lynn
Megan
Tracy

And if you’d like to play along and show us your Color Blocking designs, just load them into the SCS or PCP gallery with the keyword ihp0511 so we can find it.

CMsignature

Friday, May 6, 2011

Special Announcement from i {heart} papers


I just wanted you to know that there were some yummy new additions to the store this week, so be sure to check the new section in the store. And, LUCKY YOU…tomorrow is National Scrapbooking Day so IHP has a 10% off coupon for you when you spend $40 or more, valid starting today through Sunday. Use code NSD2011DT. Plus, all single digistamps are only $1. And all orders of $100 or more will get a free extra gift from Kate as a thank you. It might be a paper sampler or a stamp or something else! It’ll be a surprise!

So what are you waiting for? Go shopping!

Saturday, April 30, 2011

I {heart} baking

This is what I’ve been up to for the last couple of days. My grandpuppy, Sugar, turned 1 year old (in people years) yesterday, and my daughter invited some of Sugar’s doggie friends over today to celebrate. Of course, I had to bake some treats for the doggies, so I whipped up a batch of these yummies. All kinds of good stuff in there – banana, apple sauce, carrots, whole wheat flour, spelt flour and oats. Honestly, there’s nothing in there that I wouldn’t eat. But I didn’t try them. The dogs loved them, though.doggie-treats2I packaged them up like this:
doggie-bag 

And we must have some goodies for the people, right? What could be better than some pupcakes? Got the idea from the Martha Stewart website. Very time consuming, but sooo cute! And very yummy. The ears and eyes are made of chocolate, and the noses are Raisinettes. pupcakes

And because this past Monday was my son-in-law’s birthday, I baked a little something just for him – a Beer Batter Bread with Gruyere and Rosemary. It smelled divine when I baked it this morning, and I’m sure it will taste just as good. I got the recipe from the Bake at 350 blog, here. Super simple. Here it is in all its glory:
beerbread]

I just love the way my house smells when I bake. I do NOT like the way my kitchen looks afterward. I need somebody to stand next to me and clean up as I go. Any volunteers?

CMsignature

Monday, April 25, 2011

Papertrey April Blog Hop Challenge

This month, the PTI Blog Hop Challenge is to make a masculine card. It just so happens that today is my son-in-law’s birthday (Happy Birthday, Roy!), and the card I made for him uses PTI’s Enjoy the Ride stamp set and die. Unfortunately I did not get it into the mail, so I’ll have to hand-deliver it to my daughter later today.

roy-bday-11You may recognize the car from the nifty tutorial I did HERE about how to accurately die-cut images with solid dies (like PTI’s) – after they are stamped. If you have the same trouble I do with lining up the stamp with the die cut, this tutorial is for you!

I used BG Max & Whiskers paper for this card, since I was going for a dog theme here, and the colors were nice and masculine. The doggy in the car is my grandpuppy, Sugar, wishing her daddy a happy birthday. That stamp is from a little BG clear stamp set. I stamped her first on the white circle, then adhered the car (with the window trimmed out with a craft knife) on top of her. The sky and road are masked and airbrushed with Copic markers.

Enjoy the hop!

CMsignature

Saturday, April 23, 2011

Tutorial: Die-cutting stamped images

Anyone who has used Nestabilities or other open-format dies to cut their stamped images knows that it’s pretty easy to align the die around the image. But what about the solid dies that are available now? I don’t know about you, but even with clear stamps, I have a hard time stamping the image correctly on the die-cut shape – it’s always just a little wonky, even if I’m standing right above it to line it up.

So I came up with an easy way to stamp first, then cut perfectly – every time. Now, I don’t know if anyone else has come up with this idea already, but it’s new to me, so I wanted to share it with you. Here we go…

First, take a piece of cardstock and die-cut the shape. You are creating a mask. I’ve used PTI’s Enjoy the Ride die (and stamp) for this.cut-mask
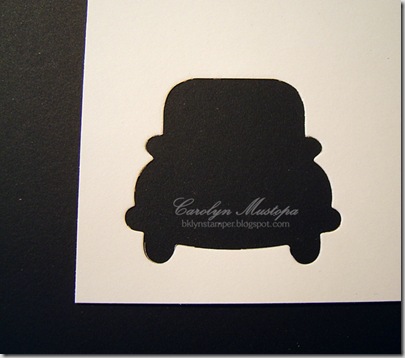
Now stamp your image.
stamp-image

Start creating your die-cutting “sandwich”. I’m using my Big Shot. Lay the stamped image (face up) on your cutting mat and align the mask over the image exactly the way you want it. You can use a little tape to hold it down if you want. (I could have aligned this a little better…) 
align-mask

Now take your die (cutting side down) and place it into the mask – you’ll feel when it’s sitting properly in there. Take a little tape and hold it down to make sure it doesn’t shift.
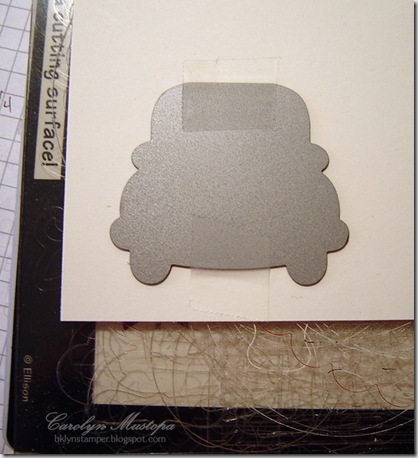
align-die

Cover it with your top plate and run it through your die-cutting machine. That’s it -- a perfectly aligned image!
perfect-cut

And you can keep your mask to use over and over again. I like to cut one in a light color and one in a dark color, depending on what I’m stamping on. And I store them right behind the dies in my binder so they’re always there when I need them. I store my dies – all of them – in a photo album binder loaded with different size pocket pages. Each pocket has either a square of black cardstock with some magnetic strips attached, or a square of of magnetic sheeting (I think they sell them as vent covers). In the back of the album, I have a couple of sheets of 8x11 magnetic sheeting, hole punched for the binder, for my border dies. Here’s a pic of one page:
storage 

Hope this has been useful and takes some stress out of your crafting time!

CMsignature

Tuesday, April 19, 2011

IHP April DT Challenge: Exclusively Yours

This month the i {heart} papers design team is spotlighting some of the stamp sets that are available exclusively through i {heart} papers. I decided to use one of my favorite Chicken Girl Design sets, Birthday Wishes.

elephant-party Now as we all know, nothing says “party” quite like a pink elephant. So I paired the image with some pretty pink papers from the Little Girl Collection Kit by Echo Park. The balloon is paper-pieced and popped up on a foam dimensional. I used this week’s inspiring Sweet Sunday Sketch Challenge #113 for my layout.

Supplies from i {heart} papers:
Stamps: Birthday Wishes (Chicken Girl Design)
Ink: Memento black, Copic markers R81, R83, YG02, C2
Paper: Little Girl Collection Kit (Echo Park), Copic Blending Cardstock
Other: Adhesive Dimensional Dots (Zva), Nestabilities – small circles

Do you have any of the exclusive IHP sets from Mint Motif, The Petal Press, or Chicken Girl Design? Would you like to share your work with us? Post it to the gallery at PaperCraft Planet or Splitcoast Stampers and use the tag ihp0411 so we can find it.

Now go check out what the rest of the IHP Design Team has this month:

Kate
Deb
Gretchen
Kendra
Loretta
Lori
Lynn
Megan
Tracy

Happy stamping!

CMsignature